Nội dung chính Top 1: Tải app Kuaikanmanhua: App đọc truyện tranh Trung Quốc miễn phíTop 2: Top 10 App Đọc Truyện Tranh Của Trung Quốc Hay Nhất ios android...
Create and run a wearable app | Android Developers
Wear OS apps run directly on a watch, giving you access to hardware such as sensors and the GPU. Wearable apps are similar to other apps that use the Android SDK, but differ in design and functionality .
A Wear OS app should work independently of a phone app, allowing users the greatest flexibility in their choice of phones. For more information, see Standalone versus non-standalone Wear OS apps .
Set up your environment
Create a Wear OS app
Start a Wear OS project
Launch the emulator and run your Wear OS app
Set up a watch
Set up a phone
Use the Android version of the companion app
Pair an Android phone to a watch
Companion app for iPhones
Pair devices with a watch emulator
Use the Wear OS emulator pairing assistant
Pair a phone with the watch AVD
Connect a phone to multiple Wear devices
Add a Wear OS module to your project
Provide a Wear OS module in your existing project
Include libraries
Differences between phone and watch apps
Save power on the watch
A Wear OS app should work independently of a phone app, allowing users the greatest flexibility in their choice of phones. For more information, see Standalone versus non-standalone Wear OS apps .
Note:
You can test your app on an actual watch using USB, Wi-Fi, or Bluetooth as described in
Debug a Wear OS app. Debugging your app on an actual watch enables you to better evaluate
the total user experience. You can also use the watch emulator in Android Studio to test
your app with different screen shapes and sizes.
Set up your environment
Install the latest version of Android Studio.
For information about creating apps in Android Studio, see
Projects overview.
Bạn đang đọc: Create and run a wearable app | Android Developers
Use the SDK manager to confirm that you have the latest version of the Android platform that supports Wear OS, Android 11 ( API level 30 ) .
If you plan to make your Wear OS apps available for Nước Trung Hoa, see Create Wear OS apps for Trung Quốc .
Create a Wear OS app
You can create a Wear OS app using Android Studio’s New
Project wizard.
Start a Wear OS project
To create a project in Android Studio :
- Click File > New > New Project.
-
In the Project Template window, click the Wear OS tab,
select Blank Activity, and click Next. -
In the New Project window, name your project, fill out the standard project
information, and click Finish.Android Studio creates a project with an app module for your data provider .
-
In the
build.gradlefile for the app module:-
In the
androidsection, confirm that the
compileSdkVersionis set to 28. -
In the
androidsection, confirm that the
targetSdkVersionis set to 28. -
Replace the
dependenciessection with Wear OS specific dependencies.
-
In the
- In the Android Manifest file, ensure the
android:name="android.hardware.type.watch"as shown in the following example:... ... -
Sync your Android Studio project.
To run the code in the new module, see
Launch the emulator and run your Wear OS app.
Launch the emulator and run your Wear OS app
To use the emulator, configure an Android Virtual Device (AVD). Confirm that you have the
latest version of the Android SDK Platform-tools from the SDK Manager.
Configure an AVD and run your app as follows :
-
In Android Studio, open the Android Virtual Device Manager
by selecting Tools > AVD Manager. - Click Create Virtual Device.
-
In the Category pane, select Wear OS
and choose a hardware profile. Click Next. -
Select a system image to download. For example,
select the image with the Release Name Pie, API Level 28,
and the Target “Android 9.0 (Wear OS)”. Click Next and
then click Finish. - Close the Android Virtual Device Manager.
-
In the Android Studio toolbar, select the AVD you just created from the target device
drop-down menu, then click Run
 .
.
The AVD starts and, after a few moments, runs your app. A ” Hello … ” message is displayed .
For more information about using AVDs, see Run apps on the Android Emulator .
If you have an existing project, you may need to update
your settings.gradle file. Make sure you use google() to indicate the
Google Maven repository. For related information, see
Google’s Maven repository.
Your settings.gradle file for your
Android Studio project should include this:
  dependencyResolutionManagement {
      ...
      repositories {
          google()
          jcenter()
      }
  }
Warning: The JCenter repository became read-only on March 31st,
2021. For more information, see
JCenter service update.
Set up a watch
Deploying an app to a watch is similar to deploying an app to a phone .
This section assumes that your watch has a USB port. If your watch lacks a USB port, see the instructions for connecting your watch using Wi-Fi or Bluetooth .
Enable adb debugging on the watch :
- Open the Settings menu on the watch.
-
Scroll to the bottom of the menu. If no Developer options
item is provided, tap System and then About. - Tap the build number 7 times.
- From the Settings menu, tap Developer options.
- Enable ADB debugging.
Connect the watch :
-
Connect the watch to your machine through USB, so you can install apps directly
to the watch. -
On the watch, tap Always allow from this computer and tap
OK.
After you connect the watch, run your app by selecting a deployment target as described in Build and run your app .
Set up a phone
This section contains information about setting up a companion phone with a Wear OS companion app .
Note:
Wear OS apps should be standalone, and work independently of a phone.
However, if your app depends on a phone app, see the following information about updating a
phone with the latest Wear OS companion app.
Use the Android version of the companion app
On an Android phone, go to the
Wear OS app listing. Tap Update to download and
install the app. After installation, confirm that
Auto-update is selected for the app (see
the “Set up automatic updates for specific apps” section of Update downloaded
apps). Tap Open to start the app.
Pair an Android phone to a watch
After you install the companion app on a phone, unpair any obsolete watch pairings, if necessary. Then pair the phone to a newly-imaged watch :
-
On the phone, select your device name from the list of devices. A pairing
code is displayed on the phone and on the watch. Ensure that the codes match. -
Tap Pair to continue the pairing process. When the watch
is connected to the phone, a confirmation message is displayed. On the
phone, a screen is displayed that lists the accounts on the phone. - Choose a Google Account to add and sync to your watch.
-
Confirm the screen lock and enter the password to start the copying of
the account from the phone to the watch. - Follow the instructions in the wizard to finish the pairing process.
Companion app for iPhones
An iOS companion app is available but the phone on which the app is installed must be running iOS 8.2 or higher :
-
On your iPhone, visit the App Store and
download
and install the Wear OS companion app on your iPhone. -
Follow the instructions on the watch and on the phone to begin the
pairing process. For additional information, see the relatedHelp page.
Pair devices with a watch emulator
You can pair devices to your watch Android Virtual Device (AVD), or emulator, manually or by
using the Wear OS emulator pairing assistant.
Use the Wear OS emulator pairing assistant
Note: Your phone must run Android 11 (API level 30) or
higher and have the Google Play Store installed to use the Wear OS
emulator pairing assistant. Also, make sure your Wear emulators run API
level 28 or higher to use the latest assistant features. To upgrade system
images for your emulated devices, use the
SDK Manager.
The Wear OS emulator pairing assistant makes it easier to manage and connect Wear emulators. You can pair multiple Wear devices with a single virtual or physical phone ; Android Studio also remembers and re-pairs previously paired devices when they’re launched .
To pair two devices, follow these steps :
- If you haven’t already,
create a Wear emulator. -
In the Device Manager, press the “overflow” dropdown menu icon
of one of the devices you want to pair and select Pair Wearable.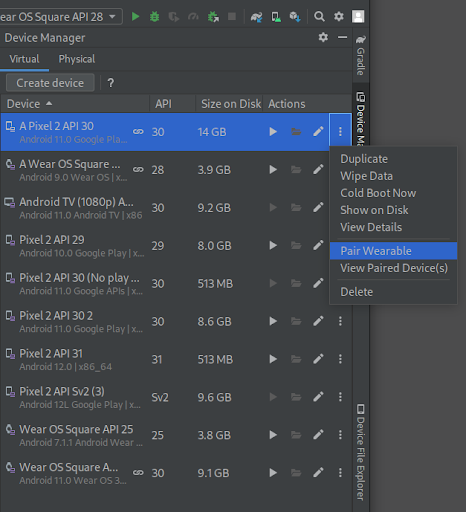
Figure 1. Dropdown menu of a device that can be paired with
a Wear emulator. -
This launches the Wear OS emulator pairing assistant. If you clicked
Pair Wearable on a phone, you see a list of available Wear
devices. If you started with a Wear device, you see a list of available
phones. Select the device you want to pair, and click Next. -
It might take a few minutes for Android Studio to launch and prepare the
devices. If your phone doesn’t have the Wear OS companion app installed
already, follow the prompts to login to the Play Store, install it, and
set it up. -
To pair your devices in the Wear OS app on your phone, click the three
dot menu and select Pair with emulator.
After your devices are successfully paired, the Device Manager shows small
icons next to the paired devices. You can also click on the overflow dropdown menu
and select View Details to see a list of paired devices.
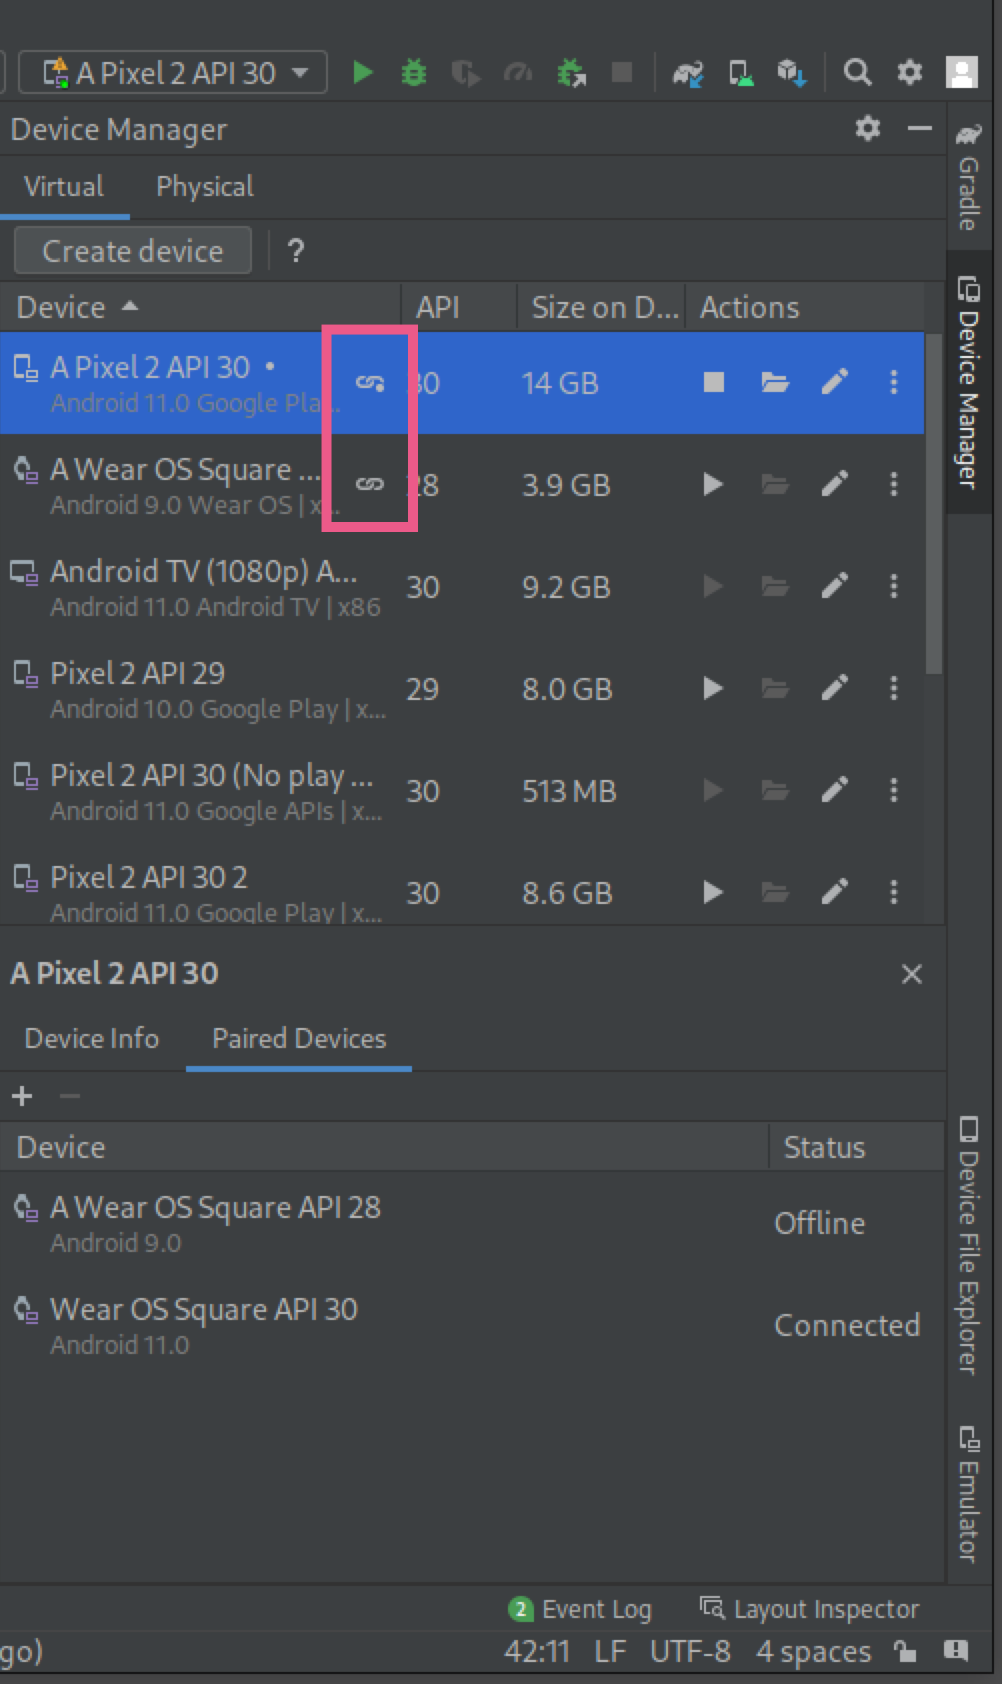
Figure 2. The Paired Devices tool window shows
devices paired with the device selected.
Pair a phone with the watch AVD
If you want a Google Account on the watch AVD for development, you can pair a phone with the watch AVD and sync a Google Account :
- Follow the steps to set up a phone.
-
On the phone, enable Developer Options and USB
Debugging. - Connect the phone to your computer through USB.
-
Forward the AVD’s communication port to the connected phone (each time
the phone is connected):
adb -d forward tcp:5601 tcp:5601 -
On the phone, in the Wear OS app, begin the standard pairing process. For
example, on the Welcome screen, tap the Set It Up button.
Alternatively, if an existing watch already is paired, in the upper-left
drop-down, tap Add a New Watch. -
On the phone, in the Wear OS app, tap the Overflow button,
and then tap Pair with Emulator. - Tap the Settings icon.
- Under Device Settings, tap Emulator.
-
Tap Accounts and select a Google Account, and follow
the steps in the wizard to sync the account with the emulator. If
necessary, type the screen-lock device password, and Google Account
password, to start the account sync.
Connect a phone to multiple Wear devices
To connect a second Wear device to a virtual or physical phone, follow the same
steps you would for an initial pairing: locate the phone or Wear device you want
to pair in the Device Manager, click on the overflow dropdown menu, and
click Pair Wearable.
Add a Wear OS module to your project
You can add a module for a Wear OS device to your existing project in Android Studio, enabling you to reuse code from your mobile ( phone ) app .
Provide a Wear OS module in your existing project
To create a Wear OS module, open your existing Android Studio project and do the following :
- Click File > New > New Module.
- In the New Module window, select Wear OS Module and
click Next. - Under Configure the new module, enter:
- Application/Library Name: This string is the title of your
app launcher icon for the new module. - Module Name: This string is the name of the folder for
your source code and resource files. - Package Name: This string is the Java namespace for the code
in your module. The string is added as the
package
attribute in the module’s
Android manifest file. - Minimum SDK: Select the lowest version of the platform that the app
module supports. For example, select API 26: Android 8.0.
This value sets theminSdkVersionattribute in thebuild.gradle
file, which you can edit later.
- Application/Library Name: This string is the title of your
- Click Next. You will see multiple code template options. Click
Blank Wear OS Activity and click Next. - In the Configure Activity window, enter or accept the default values
for the Activity Name, Layout Name, and
Source Language. Click Finish.
Android Studio creates and syncs the files for the new module.
Android Studio also adds any required dependencies for Wear OS
to the new module’s build file. The new module appears in
the Project window on the left side of the screen.
If you don’t see the new module’s folder, ensure the window is displaying the
Android view.
Include the following in the build.gradle file for the new Wear OS module:
-
In the
androidsection, set the values for
compileSdkVersionandtargetSdkVersionto 28. - Add the dependencies you need. For more information, see
Declaring dependencies. - Sync your Android Studio
project. To run the code in the new module, see
Launch the emulator and run your Wear OS app.
Include libraries
Note:
We recommend using Android Studio for Wear OS development, as it provides project setup,
library inclusion, and packaging.
When you use Android Studio’s Project Wizard, the wizard imports
dependencies in the appropriate module’s build.gradle file.
However, the dependencies are not required for all apps;
please review the information below about the dependencies.
To update an existing Wear OS project to the latest SDK version, use the settings listed in the Start a Wear OS project section .
Notifications
For information about dependencies for notifications, see Create a notification on Wear .
Wear OS UI Library
The components in the Wear OS UI Library are recommended because they exemplify best practices for watch apps. Therefore, it is recommended that you add a dependency on the Wear OS UI Library. For more information, see the following pages :
Other Jetpack libraries
Wear OS has been migrating away from the tư vấn library to Jetpack. A full list of all the new classes is in our release notes. Here are some of the highlights :
Play Services and the Wearable Data Layer APIs
If your app depends on Google Play Services, either to sync and send data ( using the Data Layer APIs ) or for other reasons, you need the latest version of Google Play Services. If you are not using these APIs, remove the dependency .
Differences between phone and watch apps
The following are some of the differences between phone and watch apps :
-
Watch apps use watch-specific APIs, where applicable (e.g., for circular
layouts, wearable drawers, ambient mode, etc.). - Watch apps have a different UX model.
- Watch apps contain functionality appropriate to a watch.
-
Watch apps can access many standard Android APIs, but don’t tư vấn the following :
android.webkitandroid.printandroid.app.backupandroid.appwidgetandroid.hardware.usb
You can check if a watch supports a feature by calling
hasSystemFeature()
before using an API.
Save power on the watch
A watch transitions from interactive mode to ambient mode when the watch is idle or when a user covers the màn hình hiển thị with their palm .
To conserve power on a watch, avoid using ambient mode. If the watch goes into the system
ambient mode while your app is active and the user interacts again with their watch within a
specified amount of time, your app will be brought up as the first thing they see.
You may want to override ambient mode in your app for specific use cases. For example, override ambient mode if the user is tracking a run and needs to see the time at all times .
Watch apps that can transition into ambient mode are called always-on apps. The following describes the two modes of operation for always-on apps :
- Interactive
- Use full color with fluid animation in this mode. The app is also responsive to input.
- Ambient
-
Render the screen with black and white graphics and do not present any input cues in
this mode. This display mode is only supported on devices running Android 5.1 or higher.
For more information and best practices, review the Keep your app visible on Wear OS page .
Source: https://vh2.com.vn
Category : Ứng Dụng

Bạn đang muốn tìm một ứng dụng quay TikTok chuyên nghiệp ? Với chiếc điện thoại thông minh có các tính năng cơ bản như quay phim, chụp hình, bạn...

Hiện nay, mọi người không chỉ kiếm tiền bằng cách làm việc trực tiếp mà còn kiếm thêm thu nhập qua các phần mềm trực tuyến. Phương thức này đang...
Vay Tốt là ứng dụng cho vay trực tuyến chất lượng và bảo đảm an toàn, mang lại dịch vụ tốt nhất .Vay Tốt là mối link giữa người vay...
Hi FPT - CHẠM LIỀN TAY, HỖ TRỢ NGAY Với tiêu chuẩn Đơn giản hóa thủ tục, Tiết kiệm ngân sách, An toàn và bảo mật thông tin, Hi FPT...